Hi there,
If you want to set up your JDK, you might want to use Jenv to let it manage multiple JDK installations and allow quick swapping between them.

Cleaning up
So, the first step would be checking if you already have some JDK installation so you can start with a fresh new installation by removing old JDK releases. This is highly recommended, although you can skip this section. This section will erase all installed JVM versions on your mac, so ensure you understand.
Execute the following if you want to wipe everything to begin w/ a new environment.
cat > cleanup.sh <<EOL
ls -1 /Library/Java/JavaVirtualMachines

sudo rm -R /Library/Java/JavaVirtualMachines/jdk1.8.0_202.jdk
sudo rm -R /Library/Java/JavaVirtualMachines/openjdk-8.jdk
sudo rm -R /Library/Java/JavaVirtualMachines/jdk-11.0.6.jdk

sudo rm -rf /Library/PreferencePanes/JavaControlPanel.prefPane
sudo rm -rf /Library/Internet\ Plug-Ins/JavaAppletPlugin.plugin
sudo rm -rf /Library/LaunchAgents/com.oracle.java.Java-Updater.plist
sudo rm -rf /Library/PrivilegedHelperTools/com.oracle.java.JavaUpdateHelper
sudo rm -rf /Library/LaunchDaemons/com.oracle.java.Helper-Tool.plist
sudo rm -rf /Library/Preferences/com.oracle.java.Helper-Tool.plist

sudo rm -rf /Library/PreferencePanes/JavaControlPanel.prefPane
sudo rm -rf /Library/Internet\ Plug-Ins/JavaAppletPlugin.plugin
sudo rm -rf /Library/LaunchAgents/com.oracle.java.Java-Updater.plist
sudo rm -rf /Library/LaunchDaemons/com.oracle.java.Helper-Tool.plist
sudo rm -rf /Library/Preferences/com.oracle.java.Helper-Tool.plist
sudo rm -rf /System/Library/Frameworks/JavaVM.framework
sudo rm -rf /var/db/receipts/com.oracle.jdk8u65.bom
sudo rm -rf /var/db/receipts/com.oracle.jdk8u65.plist
sudo rm -rf /var/db/receipts/com.oracle.jre.bom
sudo rm -rf /var/db/receipts/com.oracle.jre.plist
sudo rm -rf /var/root/Library/Preferences/com.oracle.javadeployment.plist
sudo rm -rf ~/Library/Preferences/com.oracle.java.JavaAppletPlugin.plist
sudo rm -rf ~/Library/Preferences/com.oracle.javadeployment.plist
sudo rm -rf ~/.oracle_jre_usage
EOL

chmod +x cleanup.sh ; ./cleanup.sh
To continue w/ the cleanup process, check if you have any packages left:
# something like:
pkgutil --pkgs | grep -i oracle
pkgutil --pkgs | grep -i jdk
pkgutil --pkgs | grep -i openjdk
pkgutil --pkgs | grep -i azul
and remove them:
sudo pkgutil --forget package-to-be-removedAlso, wipe out all previous Java directories and create them as an empty dir:
sudo rm /Library/Java/JavaVirtualMachines/
sudo mkdir -p /Library/Java/JavaVirtualMachines/
Installing JDK releases w/ brew
Next step will be installing all desired JDK releases using brew.
Update brew repositories
brew tap homebrew/cask
brew tap homebrew/cask-versions

# so now you can query for jdk releases like:
brew info java
brew info openjdk
brew search jdk
Installing openJDK releases
Proceed with the installation of all desired JDK releases. I choose to install OpenJDK but you can look for other JDK providers.
# if you want to install openjdk-11
brew install openjdk@11
# if you want to install openjdk-17
brew install openjdk@17
PS. You can have as many JDK versions as you’d like.
You don’t need to create any symlink or configure your PATH variable. You can just copy brew output for now and save it if you want.
Installing Jenv
brew install jenvJenv configuration
Add this eval instruction on your .bash_profile or if uzing ZSH: ~/.zshrc
eval "$(jenv init -)"Then, source your .bash_profile and reload your terminal with:
exec $SHELL -lIf you installed openjdk-11:
jenv add /Library/Java/JavaVirtualMachines/openjdk-11.jdk/Contents/Home
sudo ln -sfn /opt/homebrew/opt/openjdk@11/libexec/openjdk.jdk /Library/Java/JavaVirtualMachines/openjdk-11.jdk
If you also installed openjdk-17:
jenv add /Library/Java/JavaVirtualMachines/openjdk-17.jdk/Contents/Home
sudo ln -sfn /opt/homebrew/opt/openjdk@17/libexec/openjdk.jdk /Library/Java/JavaVirtualMachines/openjdk-17.jdk
Then, execute the rehash command:
jenv rehashand check if your versions were successfully installed with:
jenv doctor ; jenv versionsIf you get the message No JAVA_HOME set, make sure to enable the export plugin:
jenv enable-plugin export
exec $SHELL -l
Tips
Configuring the JDK per ‘scope’
You can configure one JDK version per scope on your OS.
- global: Set or show the global Java version
- local: Set or show the local application-specific Java version
- shell: Set or show the shell-specific Java version
If working with Apache Maven
Don’t forget to execute the following command if working with maven:
jenv enable-plugin mavenIf working with gradle
jenv enable-plugin gradleReloading Jenv on your terminal
exec $SHELL -lSetting up JDK per scope:
In this example, I’m setting openjdk-17.0.8 as a local scope:
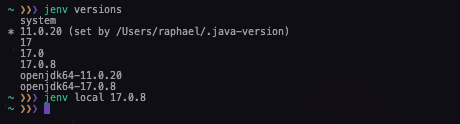
Then, you can check if the JVM was properly set up:
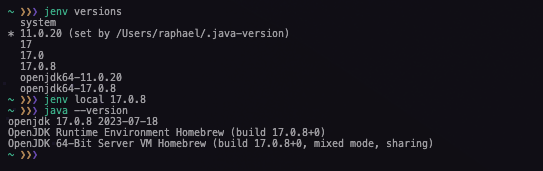
and that’s all Folks!
![]()