So, now you’ve created your microservice, and the architect of your team has decided to add a layer of security!
A wave of questions hits you, and your team discusses mechanisms, resources and methods to avoid reinventing the wheel.
Among several solutions on the market and with leading technologies, today, I share a solution that can help a lot to address the main difficulties in modern application security: Keycloak.
There are several articles and materials about keycloak, so the goal is to cover it more practically with a straightforward example using Java and Springboot.
This API has been used by me for some time for demonstration and is a practical example that can be used in various projects.
Within keycloak, your application can be classified into three types of access:
- Public
- Confidential
- Bearer-Only
For the public type, here we have the representation of a WEB application, more precisely, a front-end application that performs the login negotiation with an external user. This application is public, as it is exposed to the external public.
For confidential type, this is when we have a WEB application that ships the front-end with the back-end and resides in its own infrastructure (it can be seen as a monolithic application).
For the bearer-only type, we have a back-end application or a REST API that receives a JWT and executes the operations according to this JWT’s authorisations.
Finally, in the access management model for APIs that uses OpenID Connect, we have the main participation of the Authorization Code Grant, which through RFC 6749 specifies in detail the authentication process:
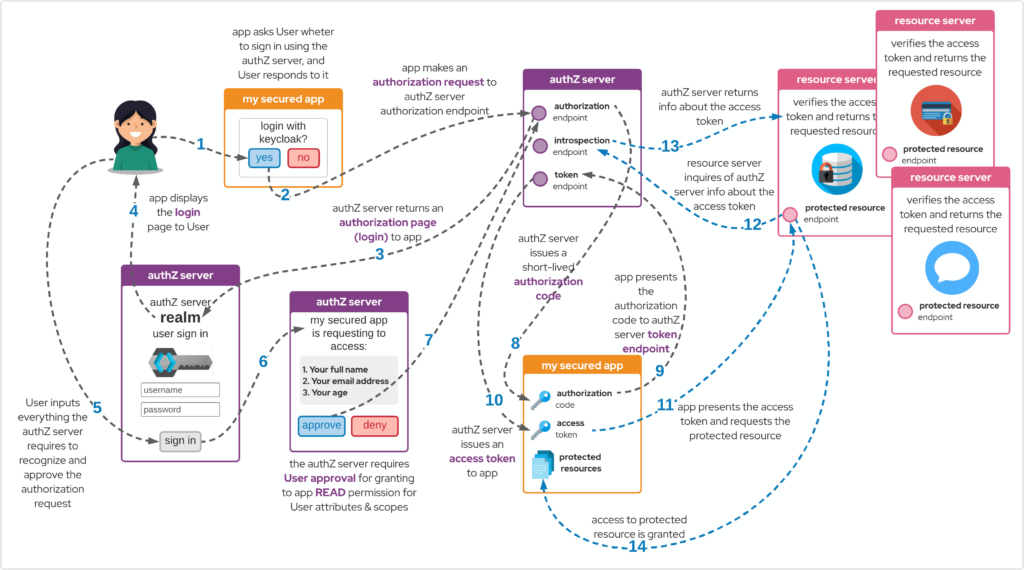
Authorization Code Grant RFC 6749
To run the project, you can access the example repository here and follow the steps:
- Start Red Hat Single Sign-On (keycloak)
- Create a new master realm admin user
- Create a new realm: sample
- Under sample realm, create a new user (usr/pwd): john/doe
- Create new sample realm clients:
- sample-api type: bearer-only
- sample-web type: public
- Create new client roles (for both clients):
- PRODUCT_VIEWER
- PRODUCT_MAINTAINER
- Assign role mappings for user john with recently created client roles
- Start springboot app on port 8070
To execute, open the terminal and follow:
git clone https://github.com/aelkz/springboot-open-id-connect-sample.git
cd springboot-open-id-connect-sample
rm -fr target ; mvn clean package
java -jar target/springboot-open-id-connect-sample-1.0-SNAPSHOT.jar ![]()